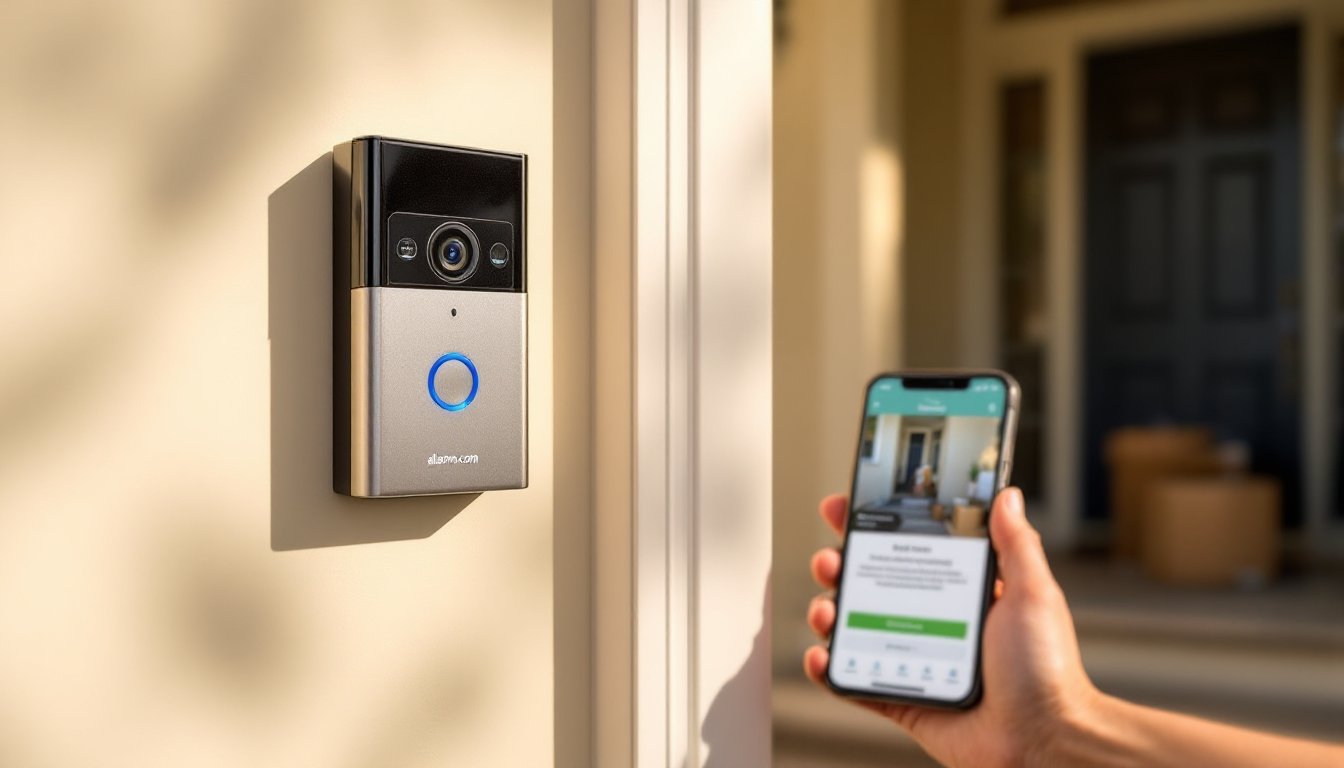
A smart doorbell camera ties your home security into one device, and if you’ve got Alarm.com systems already running, the integration is seamless. Whether you’re watching deliveries from your phone, checking who’s at the door at 2 a.m., or getting instant alerts when motion triggers, an Alarm.com doorbell camera does the heavy lifting. This guide walks through what makes these doorbells work, how to install one yourself, and whether the investment makes sense for your home’s security setup.
Table of Contents
ToggleKey Takeaways
- An Alarm.com doorbell camera integrates seamlessly with existing Alarm.com security systems, eliminating the need for multiple apps or separate monitoring services.
- The device offers 1080p video with 160-degree field of view and passive IR night vision, allowing you to identify faces and read package details in any lighting condition.
- DIY installation is straightforward if you have existing doorbell wiring; simply turn off power, disconnect the old unit, and connect new wires using the provided terminals and wire nuts.
- Alarm.com doorbell cameras cost $150–$250 upfront with monthly plans starting at $15–$25 for cloud storage and two-way talk features, offering real value for homeowners already invested in the ecosystem.
- If your home lacks existing doorbell wiring or you want battery-powered flexibility, budget extra and consider hiring a licensed electrician for safe low-voltage wire installation.
What Is the Alarm.com Doorbell Camera?
The Alarm.com doorbell camera is a smart video doorbell designed to work alongside Alarm.com’s broader home security ecosystem. It replaces your standard doorbell with a camera-equipped unit that streams live video to your phone, tablet, or connected display. Unlike standalone doorbells from other brands, this one integrates directly with Alarm.com’s monitoring platform, meaning your security system, app, and cloud storage all talk to each other without extra apps or juggling logins.
The unit mounts where your existing doorbell is, using your home’s existing doorbell wiring (typically 16–24 volts AC). If you don’t have existing wiring, say, you’re in a rental or have an older home, you can run a low-voltage wire yourself or opt for a battery-powered variant. The device sends alerts to your phone whenever someone rings the bell or motion is detected near your door. You can talk back through the camera’s speaker, so you’re having a conversation without opening the door. For homeowners already invested in Alarm.com’s ecosystem, this is a natural add-on that strengthens entry-point monitoring.
Key Features and Specifications
Video Quality and Night Vision
The doorbell camera typically captures 1080p resolution at a standard frame rate, which is sharp enough to identify faces and read package labels from the cloud recordings or live stream. The field of view is around 160 degrees horizontal, giving you a wide angle of your porch and approach without significant distortion at the edges.
Night vision uses passive infrared (IR) LEDs rather than white light, so it won’t blind visitors or attract insects. In complete darkness, you’ll see a monochrome feed with reasonable detail out to about 15–20 feet. Recent models also include HDR (High Dynamic Range), which balances bright sunlight and dark shadows, critical for a porch that gets morning or evening glare. Keep in mind that heavy rain, fog, or snow degrades any camera’s clarity: this is physics, not a product flaw.
Smart Integration and Notifications
When someone rings or triggers motion, your phone gets a push notification in under 2 seconds if your internet is stable. You can view the live stream, talk through the doorbell’s speaker, or unlock compatible smart locks, all within the Alarm.com app. Many users pair the doorbell with an Alarm.com hub and monitoring plan: if you don’t have monitoring, the basic video and alerts still work over your home Wi-Fi.
Cloud storage is included with most Alarm.com plans, storing 7–30 days of video depending on your subscription tier. The footage is encrypted in transit and at rest. Unlike some other brands, you’re not forced to buy a separate hub or third-party storage service. If your Wi-Fi drops, the doorbell falls back to local storage on its internal drive for a few hours, then overwrites older footage. You’ll reconnect and sync when the connection returns.
Installation and Setup for DIYers
Before you start: Turn off power at the breaker for your current doorbell circuit. Many doorbells run on a dedicated breaker: others may share a circuit. If you’re unsure, flip breakers one at a time and test the doorbell button, it’ll save you trouble later. Also check whether your current wiring is a single run (two wires) or includes a common/ground wire. Most homes have two wires, but some older installs have three: the Alarm.com unit works with both.
Materials you’ll need:
- Alarm.com doorbell camera unit and faceplate
- Existing doorbell wiring (or new low-voltage wire if running from scratch)
- Wire strippers (for exposing ½ inch of wire insulation)
- Wire nuts (small plastic connectors: the kit usually includes them)
- Screwdriver (Phillips and flathead: some units use security screws, so check the manual)
- Voltage tester (to confirm power is off before working)
- Level (a 2-foot level or smartphone app to ensure the unit sits square)
Basic installation steps:
- Kill the power. Use your voltage tester on the existing doorbell wires to confirm the power is off. Do not skip this, doorbell circuits may not carry high voltage, but they’re still live and can give a shock.
- Remove the old doorbell. Most doorbells have two screws holding them to the wall or jamb. Loosen them, pull the unit away gently, and disconnect the wires by either unscrewing terminal screws or pulling out push-fit connectors.
- Strip the old wires. Use wire strippers to expose ¼ to ½ inch of bare copper from each wire. Twist them slightly to unravel any strands.
- Connect new wires to the Alarm.com unit. The unit’s terminals are usually labeled. Connect the two wires (or three if you have a common) using wire nuts or the screw terminals on the back of the doorbell housing. Screw terminals are generally more reliable, tighten them firmly but don’t overtighten and strip the screw.
- Mount and secure. Use a level to ensure the faceplate is straight. Screw it into the wall or jamb using the provided mounting bracket. If the wall is stucco, use a masonry bit and plastic anchors: if it’s wood, standard wood screws work.
- Restore power and test. Go back to the breaker and flip the circuit back on. Press the physical button on the doorbell to confirm it rings inside your home or alerts your Alarm.com hub. Then configure the app: scan the QR code on the back of the unit, create or log into your Alarm.com account, and follow the Wi-Fi setup.
Pro tips:
- If your home doesn’t have existing doorbell wiring, you’ll need to run low-voltage wire from the transformer (usually in the attic, garage, or basement). Use 18 AWG or heavier wire, and run it through walls or conduit. Some jurisdictions require permits for this work: check with your local building department. A licensed electrician is worth the cost if you’re uncomfortable routing wire or working near the main panel.
- Make sure your Wi-Fi signal is strong at the front door. If it’s weak, the doorbell may drop connection. A mesh Wi-Fi system or extender can help.
- Test the doorbell from the app before assuming it’s working, sometimes the physical button tests fine, but the Wi-Fi connection hasn’t synced yet.
Pricing, Plans, and Value for Your Home
The Alarm.com doorbell camera hardware typically costs $150–$250 depending on the model and current promotions. That’s mid-range for a wired smart doorbell. If you choose a battery-powered version (useful for renters or homes without existing wiring), expect to pay slightly more and plan to recharge every 2–4 months depending on activity.
Most Alarm.com doorbell cameras require an Alarm.com monitoring or cloud storage plan to unlock their full potential. Basic plans start around $15–$25 per month and include cloud video storage, mobile notifications, and two-way talk. Professional monitoring (24/7 professional response if an alarm is triggered) runs higher, often $40–$60 per month, but adds human oversight that solo DIY systems don’t provide.
Compare this to standalone doorbells like Ring or Logitech Circle: they often have lower upfront costs but charge $4.99–$12 per month for cloud storage and may have limited local storage if the service goes down. The value proposition for Alarm.com hinges on whether you already have their ecosystem or plan to build one. If you’ve invested in an Alarm.com system, the doorbell is a natural fit that doesn’t require you to juggle apps or monitor services separately.
For a homeowner weighing options, research from CNET and Digital Trends consistently highlight integration and ease of use as top criteria, areas where Alarm.com excels if you’re already a user. If you’re starting fresh and don’t care about ecosystem lock-in, a standalone doorbell might save you money. But if you value unified alerts, professional monitoring, and a single cloud dashboard for your entire home, the monthly costs add up to real peace of mind. Factor in the hardware cost, monthly plan, and any professional installation if you don’t want to DIY, then decide if it aligns with your security budget and priorities.
Conclusion
The Alarm.com doorbell camera is a solid entry point for homeowners wanting to monitor their front door without overcomplicating their security setup. Installation is straightforward if you have existing wiring and basic electrical comfort, no special tools required. The camera delivers clear 1080p video, reliable night vision, and instant alerts. Whether it’s the right choice depends on your current security investments and willingness to commit to Alarm.com’s ecosystem and monthly plans. Install it yourself to save on labor, test everything before closing up the wall, and remember that any smart device is only as reliable as your home’s Wi-Fi, so keep that signal strong.